
|
This page is intended to provide detailed instructions on how to make "stuff" like Halloween props pop up and back down using parts found in your local home improvement center. This is not the best or cheapest but it is one of the easiest ways to build with readily available parts. Examples of the application of the Pop Up mechanism described in these instructions can be found HERE, HERE, and HERE. Hopefully Mark can give a printout of this page to his grandmother and she can make a prop by following these instructions. |
|
SAFETY |
| Compressed air is inherently dangerous and could cause severe injury or death. These instructions are being offered for entertainment purposes only. Do not attempt to actually build or use any of the mechanisms described in the instructions below unless you (1) are aware of every potential safety issue with each component, (2) wear every personal protection device ever invented, and (3) follow all Federal, State, local, and standard industry safety procedures associated with the handling and use of each individual and combined component. KEEP YOUR ARMS, LEGS, HEAD, AND BODY AWAY FROM MOVING PARTS AT ALL TIMES. |
|
SIMPLE POP UP MECHANICAL COMPONENTS |
|
|
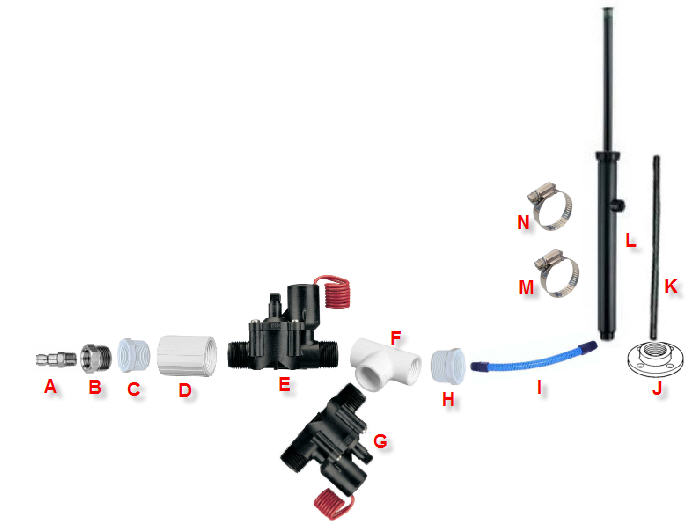
Shopping List: Give it to the guy at Home Depot and he'll use his previous Investment Banker experience to help you fill it. A - 1/4" Air Fitting. This will attach to your Air Supply. B - 1/2" to 1/4" Bushing. C - 1/2" to 3/4 Bushing. D - 3/4" Coupling (threaded at both ends). E - Sprinkler Valve with 3/4" male threads (Toro brand is the quietest). This valve will make it go up. F - 3/4" Tee (threaded in all 3 openings). G - Sprinkler Valve with 3/4" male threads (Toro brand is the quietest). This valve will make it go down. H - 1/2" to 3/4 Bushing. I - 1/2" Flexible Sprinkler Riser. J - 1/2" Floor Flange. K - 1/2" Threaded Pipe. PVC is cheaper. Galvanized and Iron Pipe is stronger. L - 12" Spring Loaded Pop Up Sprinkler Riser with 1/2" threads. M and N - 2" Hose Clamps to attach the riser to the pipe. 0 (not shown) - Teflon Tape. The Home Depot guy knows where it is and how to use it. P (not shown) - A piece of wood. If you don't know what wood looks like, Google it. |
|
Assembly: 1. Attach parts A through I as shown in the diagram using Teflon tape at each connection. 2. Find a piece of wood that will fit into the prop container (e.g., a trash can). Screw part J (floor flange) to the wood. Attach part K (threaded pipe) to part J (floor flange). 3. Attach part L (Pop Up Sprinkler Riser) to part K (threaded pipe) using parts M and N (Hose Clamps). 4. Attach part I (Flexible Sprinkler Riser) to part L (Pop Up Sprinkler Riser). 5. Secure the valve assembly (parts A through I) to the piece of wood using whatever is on hand (e.g., wire, string, plastic strap, piece of tin can, etc.). I used plumber's hanger strap. 6. Have a beer you deserve it. |

|
|
Notice how perfectly round I cut my piece of wood. I achieved this by completing assembly step 6 several times before I began steps 1 through 5. At this point you can hook up an air supply and operate the valves manually (there is a manual switch that looks like a screw on top of each valve) to make the riser go up and down. It would be a lot more fun and practical to operate it from a remote control. |
|
REMOTE CONTROL WIRING |

|
|
Shopping List: Take these instructions with you to Home Depot and Radio Shack. The guys there will know what you need. A - Network cable. It has 8 wires large enough for our purpose. Available in various lengths anywhere computer stuff is sold. One length of cable is used from the power supply to the prop. Another length of cable goes from the prop to the remote control. B - 24VAC sprinkler system power supply available at Home Depot. C - Project box for remote control from Radio Shack. D and E - Momentary push button switches from Radio Shack. Pushing the button completes the circuit. F and G - Valves shown for reference only. They were included in the mechanical build. |
|
Assembly: Note: If you are not familiar with basic wiring, you probably won't be able to make a Pop Up Prop. Sorry Grandma. It is low voltage and it won't kill you so have a beer and give it a shot anyway. You want to end up with one cable with 2 wires (6 extra wires if you use network cable) that runs from the power supply to the prop and one cable with 3 wires (5 extra wires if you use network cable) that runs from the prop to the remote control. 1. Feed one end of the remote control cable through a hole drilled in the project box. 2. Drill holes in the project box for switches D and E. The guy at Radio Shack can help you with the project box/remote control assembly instructions. 3. Connect wire W1 from the power supply to one of the wires on valve F and to one of the wires on valve G. Use wire nuts to make the connections. There is no positive and negative like a car battery so any one of the two wires from the power supply can be used. Think of this wire as the common power supply wire to the prop. 4. Connect wire W2 from the power supply to wire W3 going to the remote control. Use a wire nut to make the connection. Think of this wire as the common power supply wire to the remote control. 5. Connect wire W3 to one of the leads on push button switch D. Use solder, heat shrink tubing or both to attach the wire. Make a note that this is the POP UP SWITCH. 6. Connect wire W3 to one of the leads on push button switch E. Use solder, heat shrink tubing or both to attach the wire. Make a note that this is the DOWN SWITCH. 7. Connect one end of wire W4 to the free (unconnected) wire on valve F using a wire nut. Connect the other end of wire W4 to the free (unconnected) lead on switch D using solder, heat shrink tubing or both. 8. Connect one end of wire W5 to the free (unconnected) wire on valve G using a wire nut. Connect the other end of wire W5 to the free (unconnected) lead on switch E using solder, heat shrink tubing or both. 9. Attach switches D and E to the project box. 10. Have a beer you deserve it. |
|
AIR SUPPLY OPTIONS |
|
|
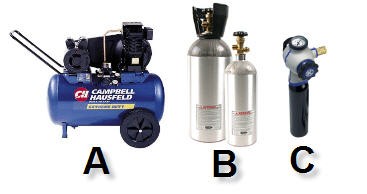
(A) Air Compressor. Pros: Makes its own Air so you don't run out. Cons: It's noisy. (B) Large Liquid CO2 Tank. Pros: Its quiet. Cons: Supply is limited by the size of the tank. (C) Portable CO2 Tank and Regulator. Uses 9 or 20 ounce paint ball tanks. Kobalt brand available at Lowes. Pros: Its quiet. Easily hidden. Cons: Supply is VERY VERY limited by the size of the tank. Recommendation: Get a bunch of each in various sizes and colors. Safety Note: Regardless of the source, the amount and force of the air supplied to the Pop Up mechanism must be controlled by a REGULATOR. The place you purchase your air source can help you with selecting, operating, and maintaining an appropriate regulator. Always begin with a low setting and work your way up. Not enough air, the Pop Up won't work. Too much air, the Pop Up (and you in extreme cases) could blow to pieces. |
| (OPTIONAL) KICK IT UP A NOTCH |
|
|
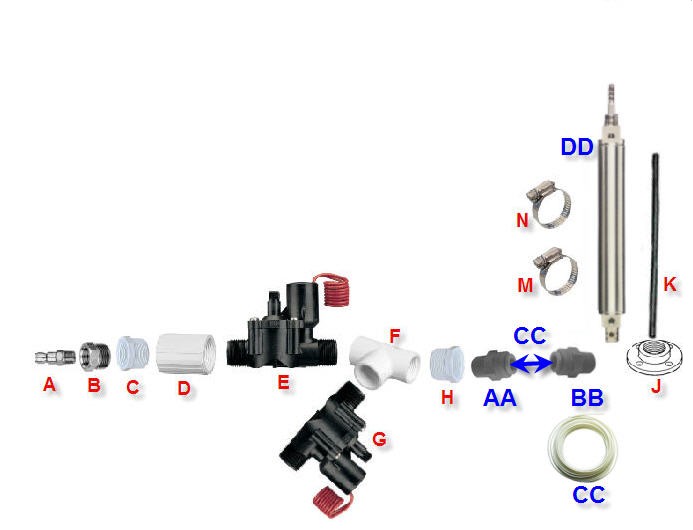
Shopping List: Replace the plastic sprinkler pop up riser with a professional air cylinder. The wiring and all other components remain the same. AA - Watts 1/4" CTS x 1/2" MPT Quick Connect Adapter available at Home Depot. BB - Watts 1/4" CTS x 1/4" MPT Quick Connect Adapter available at Home Depot. CC - 1/4 Ice Maker tubing available at Home Depot. DD - Air Cylinder. $10 to $100 on Ebay. |
|
Assembly: Find a deal on Ebay and replace the plastic sprinkler pop up riser with a professional air cylinder. Air cylinders come in all shape and sizes and typically have 5/32, 1/8, or 1/4 inch air inlet ports. Purchase the appropriate fitting (part BB) to connect the air cylinder to the valve assembly using a length of ice maker tubing. |

|
| This page was made in the USA by a couple of guys hanging around the Home Depot under the direction of Russell Snyder. snydercentral.com is a humanitarian organization that helps millions of people each year cope with lots of free time on their hands. Visit http://www.snydercentral.com for more web based clutter. Your mileage may vary. Offer void in Arkansas and may cause cancer in California. Side effects may include headache, nausea, diarrhea, and vomiting. |